
Unreal Engine 5 Blueprints Tutorial
[ad_1]
Update note: Ricardo Santos updated this tutorial for Unreal Engine 5. Tommy Tran wrote the original.
As of version 4, the Unreal Engine editor comes equipped with the Blueprints visual scripting system in addition to traditional C++ support. This system’s main purpose is to provide a friendlier programming interface than good ol’ C++, allowing the fast creation of prototypes or even allowing designers to customize game element behavior.
The Blueprint scripting system’s main feature is the ability to create code by creating boxes that represent functions and clicking and dragging wires to create behavior and define how the logic should work.
In this tutorial, you’ll use Blueprints to:
- Set up a top-down camera.
- Create a player-controlled actor with basic movement.
- Set up player inputs.
- Create an item that disappears when the player touches it.
This tutorial also makes basic use of vectors. If you’re not familiar with vectors, check out this article on vectors at gamedev.net
Getting Started
Download the starter project by clicking the Download Materials button at either the top or bottom of this tutorial and unzip it. To open the project, go to the starter project folder and open BananaCollector.uproject.
Note: If you get a message saying the project was created with an earlier version of the Unreal editor, that’s OK as long as it’s still an Unreal Engine 5 version (the engine is updated frequently). Choose either to open a copy or to convert in place.
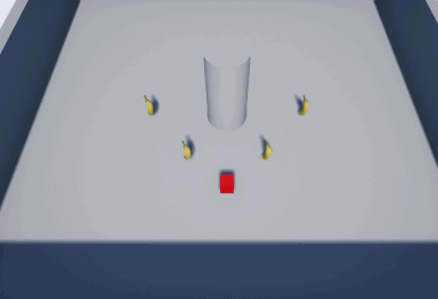
You’ll see the scene below. This is where the player will move around and collect the items.

You’ll find the project files organized in folders:
- All/Content/BananaCollector/Blueprints: Contains the Blueprints of the tutorial.
- All/Content/BananaCollector/Maps: Contains the level of the project.
- All/Content/BananaCollector/Materials: Contains the game object shaders.
- All/Content/BananaCollector/Meshes: Contains the mesh files of all the project game objects.
- All/Content/BananaCollector/Textures: Contains the textures of the project game objects.

Use the button highlighted in red above to keep the Content Drawer fixed on the Editor window. If the button doesn’t appear, the Content Drawer is already fixed.
Creating the Player
In the Content Drawer, navigate to the Blueprints folder. Click the Add button and select Blueprint Class.
The actor must be able to receive inputs from the player, so select the Pawn class from the pop-up window and name it BP_Player.

To know more about the differences between the Character and the Pawn, read this article by Epic Games.
Attaching a Camera
A camera is the player’s method of looking into the world. You’ll create a camera that looks down toward the player.
In the Content Drawer, double-click on BP_Player to open it in the Blueprint editor.
To create a camera, go to the Components panel. Click Add Component and select Camera.

For the camera to be in a top-down view, you must place it above the player. With the camera component selected, go to the Viewport tab.
Activate the move manipulator by pressing the W key and then move it to (-1100, 0, 2000). Alternatively, type the coordinates into the Location fields. They’re under the Transform section in the Details panel.

If you’ve lost sight of the camera, press the F key to focus on it.
Next, activate the rotation manipulator by pressing the E key. Rotate the camera down to -60 degrees on the Y-axis.

The final camera properties should be as shown below.

Representing the Player
A red cube will represent the player, so you’ll need to use a Static Mesh component to display it.
First, deselect the Camera component by left-clicking an empty space in the Components panel. If you don’t do this, the next added component will be a child of the Camera component.
Click Add and select Static Mesh.

To display the red cube, select the Static Mesh component and then go to the Details tab. Click the drop-down located to the right of Static Mesh and select SM_Cube.

This is what you should see (type F inside the Viewport to focus on this if you don’t see it):

Now, it’s time to spawn the player Pawn. Click Compile and return to the main editor.

Implementing the Player
Before the player can control the Pawn, you need to specify two things:
- The Pawn class the player will control
- Where the Pawn will spawn
You accomplish the first by creating a new Game Mode class.
Creating a Game Mode
A Game Mode is a class that controls how a player enters the game. For example, in a multiplayer game, you would use Game Mode to determine where each player spawns. More importantly, the Game Mode determines which Pawn the player will use.
Go to the Content Drawer and ensure you’re in the Blueprints folder. Click the Add New button and select Blueprint Class.
From the pop-up window, select Game Mode Base and name it GM_Tutorial.

Now, you need to specify which Pawn class will be the default. Double-click on GM_Tutorial to open it.
Go to the Details panel and look under the Classes section. Click the drop-down for Default Pawn Class and select BP_Player.

Click Compile and close the Blueprint editor. Before using your new Game Mode, the level needs to know which Game Mode to use. Specify this in World Settings.
World Settings
Each level has its settings. Access the settings by selecting menu Window ▸ World Settings. Alternatively, go to the toolbar and select Settings ▸ World Settings.

A new World Settings tab will open next to the Details tab. From here, click the drop-down for GameMode Override and select GM_Tutorial.

You’ll now see that the classes have changed to the ones selected in GM_Tutorial.

Finally, you need to specify where the player will spawn. You do this by placing a Player Start actor into the level.
Placing the Player Start
While spawning a player, the Game Mode looks for a Player Start actor. If the Game Mode finds one, it will attempt to spawn the player there.
To place a Player Start, go to the Toolbar, click the Add New button, and navigate to Basic ▸ Player Start. Left-click and drag Player Start from the Modes panel into the Viewport. Releasing left-click will place it.

Place this wherever you like. When you’re done, go to the Toolbar and click Play. You’ll spawn where you placed the Player Start.

To exit the game, click the Stop button in the Toolbar or press the Esc key. If you can’t see your cursor, press Shift+F1.
It’s not much of a game if you can’t move around, right? Your next task is to set up the input settings.
Setting Up Inputs
Before setting up the player inputs, it’s good to know a bit about key bindings and how to use them to create player input flexibly and powerfully.
In Unreal, you can set up key bindings that trigger an event when you press them. Events are nodes that execute when certain actions happen (in this case, when you press the bound key). When the event triggers, any nodes hooked up to the event will execute.

This method of binding keys is helpful because it means you don’t have to hard code keys.
For example, you bind left-click and name it Shoot. Any actor that can shoot can use the Shoot event to know when the player has pressed left-click. If you want to change the key, change it in the input settings.

If you had hard-coded it, you would have to go through each actor and change the keys individually.
Axis Value and Input Scale
In Unreal, the input is read through axis values determined in the project settings.
An axis value is a numerical value determined by the input type and how you use it. Buttons and keys output 1 when pressed. Thumbsticks output a value between -1 and 1 depending on the direction and how far you push it.

Use the axis value to control a Pawn’s speed. For example, if you push the thumbstick to the edge, the axis value will be 1. If you push it halfway, it will be 0.5.
Adjust the speed with the thumbstick by multiplying the axis value with a speed variable.

You can also use the axis value to specify a direction along an axis. If you multiply a Pawn’s speed by a positive axis value, you get a positive offset. Using a negative axis value will result in a negative offset. Adding this offset to the Pawn’s location determines its direction.

Because keyboard keys can only output an axis value of 1 or 0, you can use scale to convert it to a negative. It works by taking the axis value and multiplying it by the scale.
If you multiply a positive (the axis value) with a negative (the scale), you get a negative.
Now, on to creating the mappings for this project.
Axis and Action Mappings
To view the input settings, go to Edit ▸ Project Settings. Or click the Settings button on the top left of the editor window.

On the left, select Input under the Engine section.

The Bindings section lets you set up your inputs.

Unreal provides two methods to create key bindings:
- Action Mapping: These can only be in two states: pressed or not pressed. Action events will only trigger once you press or release the key. Use this for actions that don’t have an in-between state, such as firing a gun.
- Axis Mapping: These output a numerical value called an axis value (more on that later). Axis events will fire every frame. You generally use this for actions requiring a thumbstick or mouse.
For this tutorial, you’ll use axis mappings.
Creating Movement Mappings
First, you’ll create two axis mapping groups. Groups allow you to bind multiple keys to one event.
To create a new axis mapping group, click the + sign to the right of Axis Mappings. Create two groups and name them MoveForward and MoveRight.

MoveForward will handle moving forward and backwards. MoveRight will handle moving left and right.
You’ll map movement to four keys: W, A, S and D. Currently, there are only two slots to map keys. Add another axis mapping to each group by clicking the + sign next to the group name field.

To map a key, click the drop-down to bring up a list of keys. Map the W and S keys to MoveForward. Map the A and D keys to MoveRight.

Set the scale of the S and A keys by clicking the Scale field and entering -1.

Next comes the fun part: making the Pawn move! Close the Project Settings and then open up BP_Player in the Blueprints editor by double-clicking it.
Moving the Player
First, you need to get the events for your movement mappings. In the BP_Player blueprint, click the Event Graph tab on the top of the window.

Right-click an empty space in the Event Graph to get a list of nodes. From the menu, search for MoveForward. Add the MoveForward node listed under Axis Events.

Repeat the process for MoveRight.

Now, you’ll set up the nodes for MoveForward.
Using Variables
To move, you need to specify how fast the Pawn is moving. An easy way to specify the speed is by storing it in a variable.
To create one, go to the My Blueprint tab and click the + sign to the right of the Variables section.

After creating your new variable, Unreal allows you to give it a name. Set it to MaxSpeed. Afterward, in the Details tab, change the variable type to Float. Do this by clicking the drop-down next to Variable Type and selecting Float.

Next, you need to set the default value. Before setting it, though, you must click Compile in the Toolbar to sync the default value field’s type with the newly selected Float variable type.
With your variable still selected, go back to the Details tab. Go to the Default Value section and change the default value of MaxSpeed to 10.

Next, drag-click the MaxSpeed variable from the My Blueprint tab into the Event Graph. Select Get from the menu.

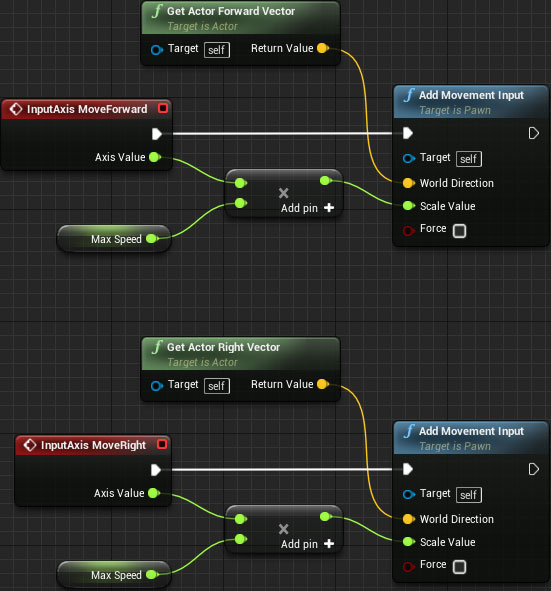
You’ll now multiply MaxSpeed and the axis value to determine the final speed and direction. Add a float * float node and connect Axis Value and MaxSpeed to it.

Getting the Player Direction
To move forward, you need to know where the Pawn is facing. Luckily, Unreal has a node for that purpose. Add a Get Actor Forward Vector node.

Next, add an Add Movement Input node. This node will take a direction and value and convert it to a stored offset. Connect the nodes like so:

The white line represents a chain of execution. In other words, when the player moves the input axis, an event will generate that will execute the InputAxis MoveForward node. The white line represents that once this happens, you’ll execute the Add Movement Input node.
The Add Movement Input node takes the following inputs:
- Target: Set to self, which in this case is the player (the red cube).
- World Direction: The direction to move the target, which in this case is the direction the player is facing.
- Scale Value: How much to move the player, which in this case is the max speed * the axis value (which, remember, is a value in the range of -1 to 1).
Repeat the process for MoveRight but replace Get Actor Forward Vector with Get Actor Right Vector. See how much you can do without reviewing the instructions above!
Adding the Offset
To move the Pawn, you need to get the offset calculated by Add Movement Input and add it to the Pawn’s location.
Your strategy will be to move the player a small amount each frame of your game, so you’ll need to add the movement to an Event Tick event, which is generated every frame.
Navigate to the Event Tick node in your Event Graph. It should be grayed out to the left, but create one if you don’t have it.

To get the offset, create a Consume Movement Input Vector node. To add the offset, create an AddActorLocalOffset node. Afterward, link them like so:
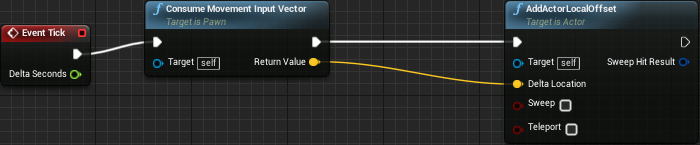
This means that for each frame of the game, you’ll get any stored movement input and add it to the actor’s current location.
Click Compile and go back to the main editor and click Play. You’ll now be able to move around! If you find there’s no response to pressing the keys, make sure the cursor is inside the game window and click to select it.

There’s one small problem: High-end machines can render frames more quickly. Because Event Tick is called every frame, the movement nodes will execute more often. This results in the Pawn moving faster on high-end machines and vice versa.
To fix this, your movement needs to be frame rate independent.
Frame Rate Independence
Frame rate independence means everything will have the same result, regardless of frame rate. Thankfully, achieving frame rate independence in Unreal is easy.
Exit the game and open up BP_Player. Next, navigate to your Event Tick node and take a look at Delta Seconds.

Delta Seconds is the amount of time elapsed since the last Event Tick. By multiplying your offset with Delta Seconds, you make your movement frame rate independent.
For example, your Pawn has a maximum speed of 100. If one second had passed since the last Event Tick, your Pawn would move the full 100 units. If half a second had passed, it would move 50 units.

If the movement is frame rate dependent, the Pawn will move 100 units every frame, regardless of the time between frames.
To multiply your offset with Delta Seconds, add a multiplication node by right-clicking and searching for * in the dialog, as shown in the figure below. Notice the connectors initially are grayed out because UE5 does not know what you would like to multiply, and as you assign values, the connectors assume the input data’s color.

The final result should look like this:

Because the time between frames (Delta Seconds) is very small, your Pawn will move much slower. Fix this by changing the default value of MaxSpeed to 600.
![]()
Congratulations, you have achieved frame rate independence!

You might have noticed the cube passes right through everything. To fix that, you need to learn about collisions.
Strap on your safety helmet because you’re about to have a head-on collision with some theory!
Actor Collisions
When you think of a collision, you probably think of cars crashing into each other. Luckily, collisions in Unreal are much safer.
To collide, an actor needs a representation of its collidable space (usually called collision). Use one of the following:
- Collision mesh: These are auto-generated (if you enable it) when a mesh gets imported. The user can also create a custom collision mesh using 3D software. The red cube already has an auto-generated collision mesh.
- Collision component: These come in three shapes: box, capsule and sphere. Add them through the Components panel. Generally used for simple collision.
Below is an example of a character and its collision.
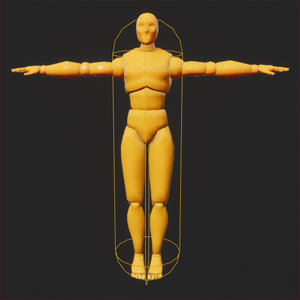
A collision occurs when an actor’s collision touches another actor’s collision.

Now, it’s time to enable collision.
Enabling Collision
You’re probably wondering why the cube didn’t collide, even though it has a collision mesh. When you move an actor, Unreal only considers the root component for collisions. Because your Pawn’s root component has no collision, it passes through everything.
Note: An actor that doesn’t have their collision as the root can still block other actors. But if you move the actor, it won’t collide with anything.
So, to use the collision mesh, StaticMesh needs to be the root. To do this, go to the Components panel. Next, left-click and drag StaticMesh to DefaultSceneRoot. Release left-click to make StaticMesh the new root.

There’s one more thing to do before collisions will work. Switch to the Event Graph and go to the AddActorLocalOffset node. Locate the Sweep input and set it to true by left-clicking the checkbox.
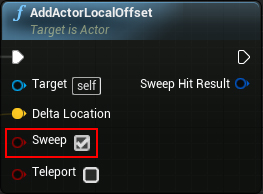
Basically, AddActorLocalOffset teleports the actor to a new location. Sweep ensures the actor collides with anything between the old and new locations.
Go to the main editor and click Play. The cube will now collide with the level!

The last thing you’ll do is create an item that disappears when the player touches it.
Creating an Item
Generally, an item is anything the player can collect. You’ll use BP_Banana as the item.
To detect when the cube touches the item, you need an event node that triggers when there’s a collision. Use collision responses to generate such events.
A collision response also determines how an actor reacts when colliding with another actor. There are three types of collision responses: Ignore, Overlap and Block. Here is how they interact with each other:
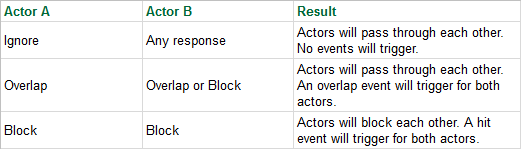
Although you can use either Overlap or Block, this tutorial will only show you how to use Overlap on the items.
Setting the Collision Response
Exit the game and open BP_Banana. Select the StaticMesh component and then go to the Details panel. The Collision section is where you’ll set the collision response. If you click the arrow to expand the menu, you’ll see that most settings are grayed out.

To make them editable, left-click the drop-down next to Collision Presets. Select Custom from the list.

You need to specify the collision response between the item and the cube.
Components have an attribute called object type. The object type is just a convenient way to group similar actors. Read more about object types here.
Because the cube’s type is WorldDynamic, you want to change the collision response to that type. Under the Collision Responses section, change the collision response of WorldDynamic to Overlap. Do this by left-clicking the middle checkbox to the right of WorldDynamic.

Handling Collision
To handle collision, you need to use an overlap event. Go to the Components panel and right-click on StaticMesh. From the context menu, select Add Event ▸ Add OnComponentBeginOverlap.

This adds the OnComponentBeginOverlap (StaticMesh) node to your Event Graph.

Finally, create a DestroyActor node and link it to the OnComponentBeginOverlap (StaticMesh) node. As its name suggests, it will remove the targeted actor from the game. However, because there’s no target, it will destroy the actor that called it.

Placing the Item
Close the Blueprint editor and ensure you’re in the Blueprints folder.
Start placing bananas into the level by left-clicking and dragging BP_Banana into the Viewport.

Click Play and start collecting the bananas!
Where to Go From Here?
You can download the completed project files by clicking Download Materials at the top or bottom of the tutorial.
You’re now one step closer to becoming an Unreal Engine expert. Hopefully this tutorial didn’t drive you bananas.
[ad_2]
Source link