
Create A Breakout Game With Flame and Forge2D – Part 2
[ad_1]
# Create A Breakout Game With Flame and Forge2D – Part 2
This article is part two of a three-part series that walks you through the creation of a Flutter Breakout game with Flame and Forge2D.
The companion articles to this tutorial are:
In part one of this series, you created a Breakout game and learned how to use Forge2D to make a ball and arena, as well as made the ball bounce off the arena’s walls.

You’re well on the way to building your very own Breakout game.

By the end of this article, you’ll add a brick wall to smash and a paddle to control the bounce. You’ll also learn how to:
- Create a custom Flame component.
- Add user input to control a body in Forge2D.
- Create a
Jointto hold bodies together and restrict their movement. - Add rigid body collision detection.
Getting Started
You can start with your project from part one or the starter project that’s available from the Download Materials button at the top or bottom of the tutorial.
Build and run. Your project should have a Forge2D ball bouncing inside an arena. This is the starting point for this part of the tutorial series.
Creating the Brick Wall
You have a ball, and now you’re going to create a brick wall for it to destroy. There are several steps ahead, the first being to define the brick body.
Creating a Brick
Creating the brick body will be very similar to the other rigid body components you’ve built, and you’ll start by defining a Brick extending from BodyComponent.
Create a brick.dart file in the components folder and add the following lines of code to this file:
import 'package:flutter/material.dart';
import 'package:flame_forge2d/flame_forge2d.dart';
import '../forge2d_game_world.dart';

// 1
class Brick extends BodyComponent<Forge2dGameWorld> {
 final Size size;
 final Vector2 position;

 // 2
 Brick({
  required this.size,
  required this.position,
 });

 // 3
 @override
 Body createBody() {
  final bodyDef = BodyDef()
   ..type = BodyType.static
   ..position = position
   ..angularDamping = 1.0
   ..linearDamping = 1.0;

  final brickBody = world.createBody(bodyDef);

  // 4
  final shape = PolygonShape()
   ..setAsBox(
    size.width / 2.0,
    size.height / 2.0,
    Vector2(0.0, 0.0),
    0.0,
   );

  // 5
  brickBody.createFixture(
   FixtureDef(shape)
    ..density = 100.0
    ..friction = 0.0
    ..restitution = 0.1,
  );

  return brickBody;
 }
}
This code may be familiar to you — in case it’s not, see below.
- Declare a
Brickcomponent. - Define the
Brickcomponent, which you’ll use multiple times to create the wall. Thesizeandpositionconstructor parameters set the unique values for individual bricks. - Set up the brick bodies to be static, but static doesn’t mean immobile. Think about a box in your garage — it doesn’t move on its own. But it moves when you push it, kick it, or brush it aside. Your bricks will behave similarly when the ball collides with them. Then you set
angularDampingandlinearDampingto 100% to prevent any movement. Remember that we represent these values with a floating point number between 0.0 and 1.0 - Make the shape of the brick to be a polygon box shape.
- Define and create the fixture for the body.
Creating a Custom Flame Component
Now that you have the Brick body component, you can build a wall — one brick at a time. How painful!
In this section, you’ll create a Flame component so you can treat the entire wall as a single component.
Create a file named brick_wall.dart in the components folder then add the following code to it:
import 'package:flutter/material.dart';
import 'package:flame/components.dart';
import '../forge2d_game_world.dart';
import 'brick.dart';

// 1
class BrickWall extends Component with HasGameRef<Forge2dGameWorld> {
 final Vector2 position;
 final Size? size;
 final int rows;
 final int columns;
 final double gap;

 // 2
 BrickWall({
  Vector2? position,
  this.size,
  int? rows,
  int? columns,
  double? gap,
 }) : position = position ?? Vector2.zero(),
    rows = rows ?? 1,
    columns = columns ?? 1,
    gap = gap ?? 0.1;

 // 3
 @override
 Future<void> onLoad() async {
  await _buildWall();
 }

 Future<void> _buildWall() async {
 }
}
The brick wall is a collection of Brick components where each brick is a BodyComponent. With Flame, you need to create a custom component so that you can treat the entire wall as a single component with the following logic:
- Declare
BrickWallas a subclass ofComponentwith a mix ofHasGameRef. TheHasGameRefis like the glue that binds the component to yourForge2dGameWorld. - Define a
BrickWallconstructor to allow for setting theposition, overallsize, the number of brickrowsandcolumns, and the size of thegapbetween bricks. - Create a the Flame game loop since the
BrickWallis a Flame component. The loop will callonLoadduring the load cycle.
Creating the Brick Wall
Now you’re going to actually build a brick wall.
In brick_wall.dart, add the following code to _buildWall:
  // 1
  final wallSize = size ??
    Size(
     gameRef.size.x,
     gameRef.size.y * 0.25,
    );

  // 2
  final brickSize = Size(
   ((wallSize.width - gap * 2.0) - (columns - 1) * gap) / columns,
   (wallSize.height - (rows - 1) * gap) / rows,
  );

  // 3
  var brickPosition = Vector2(
   brickSize.width / 2.0 + gap,
   brickSize.height / 2.0 + position.y,
  );

  // 4
  for (var i = 0; i < rows; i++) {
   for (var j = 0; j < columns; j++) {
    await add(Brick(
     size: brickSize,
     position: brickPosition,
    ));
    brickPosition += Vector2(brickSize.width + gap, 0.0);
   }
   brickPosition += Vector2(
    (brickSize.width / 2.0 + gap) - brickPosition.x,
    brickSize.height + gap,
   );
  }
The construction of the brick wall is pretty straightforward. First, you calculate the brick size and wall position. Then you build the wall one row at a time.
Here’s some more detail:
- If the caller doesn’t specify the size of the brick wall, this sets the area to fill to the full width of the game area and 25% of the height.
- Calculate the brick size from the given wall dimensions.
- Set the position of the first brick.
- Create a wall of bricks by adding each brick to the game world.
You’re now ready to add the wall to your game!
Open the file forge2d_game_world.dart, add an import for brick_wall.dart:
import 'components/brick_wall.dart';
Create an instance of BrickWall in _initializeGame just after the Arena:
  final brickWallPosition = Vector2(0.0, size.y * 0.075);

  final brickWall = BrickWall(
   position: brickWallPosition,
   rows: 8,
   columns: 6,
  );
  await add(brickWall);
BrickWall uses the position parameter to locate the first brick in the wall.
Then, BrickWall builds the wall row by row from top to bottom, and Vector2(0.0, size.y * 0.075) places the wall against the left edge while leaving 7.5% of the game area above.
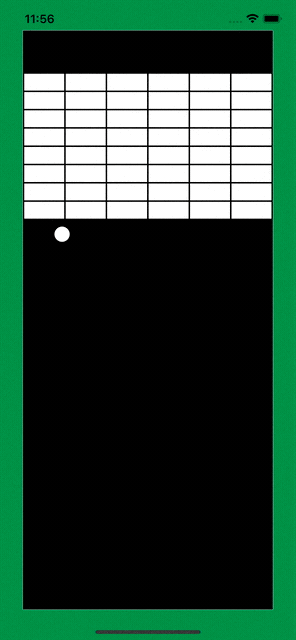
Build and run your project. You’ll now see a brick wall at the top of the game arena. Another major Breakout game component is now in place.
Creating the Paddle
The final element of the Breakout game to make is the user-controlled paddle. Like the ball and bricks, the paddle is also a rigid body and your first step is to declare the Paddle body component.
Create a paddle.dart file in the components folder and add the following lines of code to this file:
import 'package:flame/extensions.dart';
import 'package:flame_forge2d/flame_forge2d.dart';
import '../forge2d_game_world.dart';

class Paddle extends BodyComponent<Forge2dGameWorld> {
 final Size size;
 final Vector2 position;

 Paddle({
  required this.size,
  required this.position,
 });

 @override
 Body createBody() {
  final bodyDef = BodyDef()
   ..type = BodyType.dynamic
   ..position = position
   ..fixedRotation = true
   ..angularDamping = 1.0
   ..linearDamping = 10.0;

  final paddleBody = world.createBody(bodyDef);

  final shape = PolygonShape()
   ..setAsBox(
    size.width / 2.0,
    size.height / 2.0,
    Vector2(0.0, 0.0),
    0.0,
   );

  paddleBody.createFixture(FixtureDef(shape)
   ..density = 100.0
   ..friction = 0.0
   ..restitution = 1.0);

  return paddleBody;
 }
}
The Paddle code should be very familiar at this point. There’s nothing new here — it’s just another rigid body in your Forge2D world.
Now you can add the paddle to your game.
Open the file forge2d_game_world.dart then add an import for paddle.dart as well as for the size component:
import 'package:flame/extensions.dart';
import 'components/paddle.dart';
Then, create an instance of Paddle in _initializeGame just after the BrickWall:
  const paddleSize = Size(4.0, 0.8);
  final paddlePosition = Vector2(
   size.x / 2.0,
   size.y * 0.85,
  );

  final paddle = Paddle(
   size: paddleSize,
   position: paddlePosition,
  );
  await add(paddle);
You’ve set the paddle to four meters wide by 80 centimeters high, a reasonable size for the game area. The position is relative to the center of the paddle body. This paddlePosition centers the paddle on the x-axis and down 85% from the top of the game area.
Build and run your project. You now have all the elements for a Breakout game: a ball, a brick wall and a paddle. Woohoo!

Giving User Control of the Paddle
You have your paddle, but your breakout game won’t be much fun until it responds to user input. That’s what you’ll build next.
Flame supports several input forms, including gesture input. The Flame Draggable mixin is the perfect feature for implementing user control of the paddle.
Setting Up Draggable Mixin
Open forge2d_game_world.dart and add the following import:
import 'package:flame/game.dart';
You’re including the mixin HasDraggables in your Forge2DGame to inform the game world that it’ll have draggable components.
Insert this:
class Forge2dGameWorld extends Forge2DGame with HasDraggables {
You’ve just added the HasDraggables mixin to your Forge2dGameWorld class.
Open the paddle.dart file and add:
class Paddle extends BodyComponent<Forge2dGameWorld> with Draggable {
You’ve just added the Draggable mixin to the Paddle class.
Then include the following imports to get the Draggable mixin:
import 'package:flame/components.dart';
import 'package:flame/input.dart';
And now override the mixin routine onDragUpdate, like so:
 @override
 bool onDragUpdate(DragUpdateInfo info) {
  body.setTransform(info.eventPosition.game, 0.0);

  // Don't continue passing the event.
  return false;
 }
Flame sends your draggable component’s data about the drag event so you can use it to update the paddle’s position. For now, you’re using setTransform to update the location and rotation of the paddle body.
Build and run!
To drag the paddle, you must be inside the shape area of the paddle.

The paddle recognizes user input but still doesn’t behave how you’d expect. In this game format, it should be horizontally constrained within the game area.
in the next section, you’ll use a MouseJoint to constrain the paddle’s movement.
Constraining Body Movement with Joints
Using setTransform to define the location of a body in the Forge2d world works, but it’s not the best method to move the paddle.
Why?
Because using setTransform is like being beamed from point A to point B. If points A and B are far apart, it looks unnatural—unless you live in the Star Trek universe.
It’s more natural for a body to move through a series of locations, starting a point A and ending at point B. You’ll accomplish this effect with a MouseJoint.
But a MouseJoint alone isn’t enough to implement the correct Breakout paddle behavior — it must also be constrained to only move side to side.
A PrismaticJoint restricts the movement of a body along an axis.
You’ll use these two joints together on the paddle body to create the desired behavior!
Note: Joints connect bodies in Forge2D. Joints are a complex topic deserving a more robust discussion, but doing so would derail you from finishing this Breakout game tutorial. There’s a link at the end if you’d like to learn more.
Creating a Mouse Joint
A MouseJoint is used to make a body track to a world point.
Joints connect bodies. The paddle is one body, but what will be the second body?
The arena body fills the screen area and will make a good anchor body for the MouseJoint. The arena will be the “ground” for the MouseJoint joint.
In other words, you’ll create a MouseJoint and have it track to a world point provided by DragUpdateInfo.
Open paddle.dart and add a new ground parameter to the Paddle class:
 final Size size;
 final BodyComponent ground;
 final Vector2 position;

 Paddle({
  required this.size,
  required this.ground,
  required this.position,
 });
Next, add these variables:
 MouseJoint? _mouseJoint;
 Vector2 dragStartPosition = Vector2.zero();
 Vector2 dragAccumlativePosition = Vector2.zero();
These will hold the mouse joint, the drag start position and the accumulative drag offset.
Now, you’re going to change the onDragUpdate routine and add new routines for handling the start, end and cancel drag events.
 // 1
 @override
 bool onDragStart(DragStartInfo info) {
  if (_mouseJoint != null) {
   return true;
  }
  dragStartPosition = info.eventPosition.game;
  _setupDragControls();

  // Don't continue passing the event.
  return false;
 }

 // 2
 @override
 bool onDragUpdate(DragUpdateInfo info) {
  dragAccumlativePosition += info.delta.game;
  if ((dragAccumlativePosition - dragStartPosition).length > 0.1) {
   _mouseJoint?.setTarget(dragAccumlativePosition);
   dragStartPosition = dragAccumlativePosition;
  }

  // Don't continue passing the event.
  return false;
 }

 // 3
 @override
 bool onDragEnd(DragEndInfo info) {
  _resetDragControls();

  // Don't continue passing the event.
  return false;
 }

 // 4
 @override
 bool onDragCancel() {
  _resetDragControls();

  // Don't continue passing the event.
  return false;
 }

 // 5
 void _setupDragControls() {
  final mouseJointDef = MouseJointDef()
   ..bodyA = ground.body
   ..bodyB = body
   ..frequencyHz = 5.0
   ..dampingRatio = 0.9
   ..collideConnected = false
   ..maxForce = 2000.0 * body.mass;

  _mouseJoint = MouseJoint(mouseJointDef);
  world.createJoint(_mouseJoint!);
 }

 // 6
 // Clear the drag position accumulator and remove the mouse joint.
 void _resetDragControls() {
  dragAccumlativePosition = Vector2.zero();
  if (_mouseJoint != null) {
   world.destroyJoint(_mouseJoint!);
   _mouseJoint = null;
  }
 }
This code looks lengthy, but it’s pretty straightforward. Here’s a step-by-step explanation:
-
onDragStartchecks to ensure there isn’t already aMouseJointin use. If not, it gets the drag start position and sets up the drag controls. Note that a mouse joint is active only during a drag event. -
onDragUpdategets the current drag offset position and then checks the accumulative drag position against the paddle’s current position. The paddle position is updated only when the new position is far enough away to justify moving. Note that you removedbody.setTransformfromonDragUpdateand replaced it with this new code. -
onDragEndresets the drag controls. -
onDragCancelalso resets the drag controls. -
MouseJointDefidentifies the two bodies connected by the joint and their relationship,frequencyHzis the response speed,dampingRatiois how quickly the body will stop moving, andcollideConnectedflags whether or not the two bodies can collide with each other. Note that this is similar to creating a body or fixture. - Remove the mouse joint and reset the mouse joint variables.
Open the file forge2d_game_world.dart and update the Paddle instance, like so:
  final paddle = Paddle(
   size: paddleSize,
   ground: arena,
   position: paddlePosition,
  );
  await add(paddle);
Now your Paddle includes the new ground parameter — remember, a joint needs two bodies. The Arena is now the second body tied to the paddle.
Build and run.
Drag the paddle. You’ll notice that the paddle follows the drag input. The behavior is subtle but important. Your finger doesn’t set the paddle’s position; your input asks Forge2D to move the paddle to a new location.

Creating a Prismatic Joint
Now you’re going to limit the paddle’s movement to the horizontal plane with PrismaticJoint.
The MouseJoint is associated with the drag event, and it is created and destroyed when the user drags the paddle. You need something more durable than that.
The PrismaticJoint is valid for the life of the paddle body and can be created just once after the paddle body is mounted. That sounds more viable, no?
Open paddle.dart and add the following onMount method to the Paddle class:
 @override
 void onMount() {
  super.onMount();

  // 1
  final worldAxis = Vector2(1.0, 0.0);

  // 2
  final travelExtent = (gameRef.size.x / 2) - (size.width / 2.0);

  // 3
  final jointDef = PrismaticJointDef()
   ..enableLimit = true
   ..lowerTranslation = -travelExtent
   ..upperTranslation = travelExtent
   ..collideConnected = true;

  // 4
  jointDef.initialize(body, ground.body, body.worldCenter, worldAxis);
  final joint = PrismaticJoint(jointDef);
  world.createJoint(joint);
 }
Step through the code:
- Set the
worldAxisto restrict the paddle’s movement to the x-axis. - Set the extent that the paddle can move. The paddle movement is relative to the origin of the paddle, which is at its center. Set
travelExtentto a distance of half the width of the game area minus half the width of the paddle to keep the movement within the arena. - Create the prismatic joint definition with the movement limits.
- Create the joint then add it to the game world.
Build and run. The paddle movement is now limited to moving from side to side.

Cool! Your game is beginning to look like the Breakout game. Now you need to add some logic so you can destroy those bricks.
Adding Collision Detection
To destroy a brick, you must know when the ball collides with a brick. Your Forge2D collision detection code must uniquely identify the rigid bodies that have come in contact.
To determine the bodies involved in a given collision, you need to add userData to the body definition to identify the bodies uniquely.
Open ball.dart then set the userData property to reference this instance of the ball, like this:
  final bodyDef = BodyDef()
   ..userData = this
   ..type = BodyType.dynamic
   ..position = position;
Now, open brick.dart and add a similar userData property for the bricks:
  final bodyDef = BodyDef()
   ..userData = this
   ..type = BodyType.static
   ..position = position
   ..angularDamping = 1.0
   ..linearDamping = 1.0;
Your new this reference makes it so each brick in the wall is uniquely identified from other bricks. When a ball collides with a brick, Forge2D will use this data to identify the rigid bodies.
When a collision between the ball and a brick happens, the brick is responsible for recording the collision. Then, when the game loop updates, the brick wall checks for destroyed bricks and removes them from the Forge2D world.
In brick.dart, add the mixin ContactCallbacks to the Brick class.
class Brick extends BodyComponent<Forge2dGameWorld> with ContactCallbacks {
This mixin provides access to the contact methods.
Now, add the below:
 var destroy = false;

 @override
 void beginContact(Object other, Contact contact) {
  if (other is Ball) {
   destroy = true;
  }
 }
You just added a flag to indicate if this brick collided with the ball —beginContact sets the flag and is one of the ContactCallbacks Forge2D provides to alert you to collisions between bodies.
Add the below to brick.dart:
import 'ball.dart';
Your code needs this to import the Ball class.
The ball may collide with one or more bricks in a game loop cycle. The brick wall component is an excellent place to check the status of and remove destroyed bricks.
Open brick_wall.dart then add the following update method:
 @override
 void update(double dt) {
  // Check for bricks in the wall that have been flagged for removal.
  // Note: this is a destructive process so iterate over a copy of
  // the elements and not the actual list of children and fixtures.
  //
  for (final child in [...children]) {
   if (child is Brick && child.destroy) {
    for (final fixture in [...child.body.fixtures]) {
     child.body.destroyFixture(fixture);
    }
    gameRef.world.destroyBody(child.body);
    remove(child);
   }
  }

  super.update(dt);
 }
The above code helps us verify which of our bridges have been marked for removal, then destroys their fixtures and bodies. Remember that, when removing bodies from Forge2D, you must first remove the body’s fixtures then you can remove the body.
Build and run and see if you can smash some bricks now.

Another round of congratulations is in order!
You’ve created a ball, paddle and wall of bricks. The user can control the paddle to bounce the ball into the bricks and destroy them.
Where to Go From Here?
You can download the completed project files by clicking the Download Materials button at the top or bottom of the tutorial.
During part two of this series, you learned how to:
- Create a custom Flame
Componentfor the brick wall. - Add
Draggableuser input controls to Forge2D rigid bodies. - Move bodies in Forge2D using
setTransformandMouseJoint. - Constrain the movement of a rigid body using a
PrismaticJoint. - Detect collisions between rigid bodies using
ContactCallbacks.
When you’re ready to deep dive into Forge2D joints, visit this article: Box2D C++ tutorials – Joints – overview.
The third and final part of the Create A Breakout Game With Flame and Forge2D tutorial series will show you how to complete your Breakout game.
Right now, you have all the mechanics needed for a Breakout game, but it is a lawless land. It’s missing rules and logic to enforce them.
Your game also lacks visual appeal — everything is black and white.
By the end of part three, these issues will be addressed and you’ll have a beautiful, addictive game to play when you’re bored: Create A Breakout Game With Flame and Forge2D – Part 3
We hope you enjoyed this tutorial, and if you have any questions or comments, please join the forum discussion below!
[ad_2]
Source link